iShopNCook is made of three locations:
You can rotate the app between these three locations by tapping on the top left and right buttons at the top of the app.
The application settings and the in-app purchase sections can be accessed in the home screen.
Tap on the above sections to see a detailed help. Consult this user's manual as need arises. You can access it anytime from the home screen by tapping the home button in one of the three main screens.

Sweep down to display the controls of the kitchen.
Control legend:
- Action button: Delete cookbooks
- Plus button: Add recipes and cookbooks
- Earth button: Search for recipes on the internet
- View button: Search your cookbooks
- Toggle button: Switch between grid and line display
To import cookbooks from Shop'NCook software for PC and Mac, share cookbooks with other users of iShopNCook and download cookbooks from the internet, see the Import/Export module of the in-app purchase section.
To synchronize your cookbooks with Shop'NCook software, see the Cookbook Plus module of the in-app purchase section.
To create a cookbook, sweep down to display the controls of the kitchen, tap on the Plus button and select "New Cookbook".
To delete a cookbook, sweep down to display the controls of the kitchen, tap on the Action button and select the cookbooks you want to remove.
In line display mode, you can also delete a cookbook with a sweep.
This function requires the Import/Export module.
To access the bonus cookbooks or download cookbooks from the internet, sweep down to display the controls of the kitchen, tap on the Plus button and select "Download Cookbooks" from the menu.

Tap on a cookbook to open it. Sweep down to display the controls.
Control legend:
- Action button: Change the cookbook name and picture, delete recipes
- Plus button: Add a recipe from a picture or by typing
- Earth button: Search for recipes on the internet
- View button: Search your cookbooks
- Toggle button: Switch between grid and line display
In line display mode, you can also delete a recipe with a sweep.
To return to the kitchen when viewing a cookbook, tap on the bookshelf icon on the top of the screen.

Open a cookbook, tap on the action button and select "Edit Cookbook Info" to set a cookbook picture or edit its title.

To add a recipe, tap on the Plus button in the Kitchen toolbar or in a cookbook area.
You can add a recipe in second by taking a picture of the recipe in a book or a newspaper clip for example. In this way you can organize effortlessly all the recipes you have collected through the years.
For the best results, when adding a recipe from a picture, make sure you have enough light for the best picture quality, that the camera is focused on the text - you can adjust the focus by taping on the screen of the iPhone - and that the title is the first line of text in the photo area.
You can also add a recipe simply by typing or pasting the text of the recipe. When adding from a text, make sure that the recipe title is the first line of the text.
The recipe is sent to Shop'NCook server for analysis and automatic recognition of ingredients and instructions. It is then sent back to your phone correctly analyzed and formatted, ready to be added to your shopping list and meal plan. The recipe is removed from the server after treatment.
The remote recipe analysis service recognizes ingredients and quantities with a great accuracy and makes adding new recipes a breeze.
If the recipe in not in your shopping list language, make sure to select the correct language before submitting it to the server. At the time being, Shop'NCook recipe engine can analyze recipes in English, German, French and Italian.
Note that until a recipe has been processed, it is grayed out and cannot be edited.
You can add about 20 recipes to the app for free. Afterwards, to continue using Shop'NCook online services, you need to subscribe to Cookbook Plus.

After selecting a cookbook, you can sort the recipes in four different ways by taping on the button at the bottom of the screen:
- Alphabetically
- By course
- By chapters
- By the number of ingredients
Chapters are only available at the time being in cookbooks imported from Shop'NCook Menu or Shop'NCook Pro software for PC and Mac.
If you have the Grocery Plus module, the sort by pantry sorts the recipes by the number of ingredients you don't have in stock. The pantry sort lets you localized rapidly recipes that only require you to purchase a few ingredients or that you can cook with what you have in your pantry.

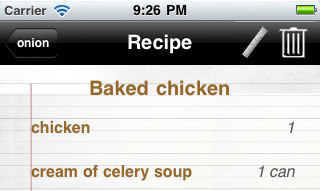
Tap on a recipe to view it. You can tap on the center of the screen to show or hide the controls.
Control legend:
- Shopping button: Add the ingredients of the recipe to the shopping list
- Edit button: Edit the recipe
- Action button: Send the recipe by e-mail, share on Facebook or print
You can also quickly edit the rating, difficulty and course by tapping on these items and selecting the appropriate value. A picture can be added or modified in the same way.

At the bottom of the screen, you have the scaling tool that lets of change the number of servings and the portion size of the recipe.
To share a recipe on Facebook, display the recipe and tap on the Action button. Select "Share on Facebook".
You will be able to login to your Facebook account and add the recipe to your timeline.
Your Facebook friends will be able to add the recipe to their own copy of iShopNCook just by tapping on the link in your timeline.

Tap on the pen to edit the recipe. By tapping on the icons at the beginning of the lines, you can toggle between an instruction and an ingredient line. Select an ingredient line to view its details and link it to the database of grocery items.
Tap of the earth button to search for recipes online. Once you have found a suitable recipe, you can add it in seconds to the app by selecting the text of the recipe and tap "Import Selection".
See the section on adding recipes for more information.

Tap on the magnifying glass button to search the recipes. You can search recipes with the following criteria:
- Words in recipe title and tags
- Cookbooks
- Ingredients that must be included
- Ingredients that must not be included
- Number of stars
- Difficulty
- Course
- Cooking time
You can clear a research criteria with a sweep.
The pantry is only accessible if you have purchased the Grocery Plus module.
The pantry allows you to add grocery items to the shopping list independently from recipes and manage your coupon and sale price information.
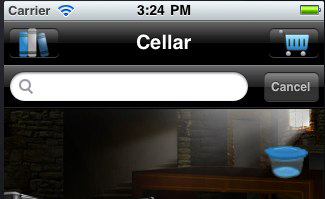
You access the items of the database by tapping on a section of the pantry or by using the search tool.
To display the legend of the sections, tap on the staircase of the pantry.
There are over 2000 grocery items in the database. The database also includes non-food grocery items, like personal care, cleaning supplies, pet care, etc.
Initially, only the main items of a section are displayed. To view all the items, tap on the magnifying glass of the toolbar.

Tap on the disclosure arrow of an item to open the detail view.
In the item detail view, you can
The plastic container in the main pantry screen lets you access the list of items you always keep in stock.
The section of items in stock is empty at the beginning. To populate it, select all the sections of the pantry in succession and indicate which items you always keep in stock in the item detail screen. The items of this section are deselected by default when you add a recipe to the shopping list. Also, the pantry sort of your cookbooks sorts the recipes in function of the number of ingredients you don't keep always in stock.
The "always in stock" section is not meant to be an inventory of what you have currently at home, but a list of the staples you want to always keep on hand, - for example water, condiments, flour, sugar, etc - so that you can see at a glance what is missing and add them easily to the shopping list.
To help you locate rapidly the items you use regularly, a selection of main items is displayed by default when you select a section of the pantry.
You can select if an item belongs to the main list in the item detail screen.
You should add to the main list all the grocery items you purchase on a regular basis that are not associated with a recipe.
Tap an item's disclosure arrow to display the detail screen. You can input there the sale and coupon information.
The next time you purchase the item, the shopping list will indicate that a price or coupon is associated with this item to make sure you purchase the correct one. Also, you will be reminded to present the coupon at the register during the checkout.

Tap on the disclosure arrow of an item to display its detail screen. The detail screen shows you the quantity break-down per recipe.
In the detail screen, you can:
- change the quantities
- remove a quantity by sweeping
- display the details of the recipe(s) requiring the selected item
Additionally, if you have installed the Grocery Plus module, you can:

Tap on the cash register button to go to the check-out. The check-out screens show you in succession:
- a summary of the items you have crossed-out with their price and total,
- the sale price information and the list of the coupons you have to present at the register (requires the Grocery Plus module),
- the list of the recipes included in the shopping list with calendar buttons to schedule them.
When you complete the checkout, the crossed-out items are cleared from the shopping list and the corresponding coupons and sale information is erased.

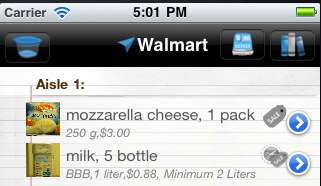
If you have installed the Grocery Plus module, you have the option of sorting the shopping list according to the aisles of your current supermarket.
To select a supermarket, tap on the location button on the shopping list page's title. The app will select automatically the supermarket corresponding to your current location, if any, and sort the shopping list and select products accordingly.
If you don't have supermarket defined or if none of your supermarket matches the location, the shop picker screen is displayed instead.
In the shop picker, you can:
- select a supermarket
- create a new supermarket
- edit the name and sort the aisles of a supermarket
- delete a supermarket
- drop a pin to save the location of the current supermarket
For best result, drop a pin or use the location function to select the current supermarket just outside the shop, as the location functions don't work inside.
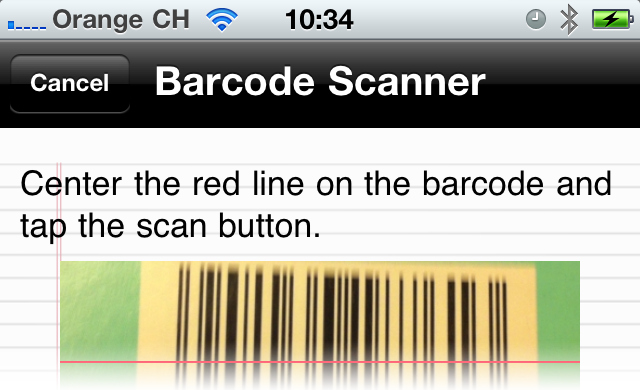
If you have installed the Grocery Plus module, you can add the products with the barcode scanner.
To access the barcode scanner, display the detail screen of an item of the shopping list and tap the barcode icon of the toolbar.
For best results, make sure to the phone camera is focused on the barcode and that the red line crosses completely the barcode.
Once the barcode has been read, it is automatically looked up online in our barcode database. If it is found, the product information (product name, brand, size and picture) is initialized.
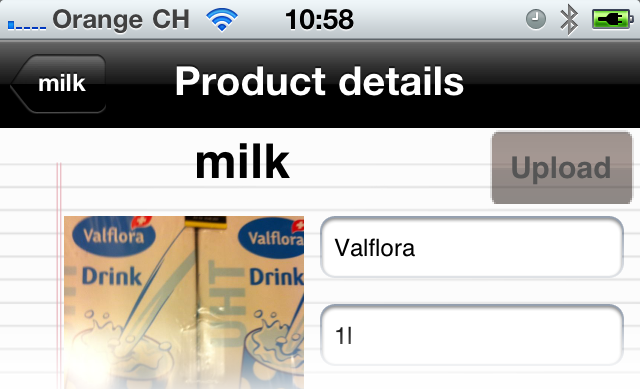
If the barcode is not found online, you can help us complete our database by contributing yourself the product information of missing barcodes or of barcodes with incorrect information. After inputting the actual product name, brand, size and optionally the picture of the product, tap on Upload to add the information to the database and share it with the other users of the app.
Note that the online database does not store the supermarket or price information.
This function requires the Grocery Plus module.
You reach the product editor by selecting a product in the detail screen of a shopping item or by scanning a barcode to add a new product.
In the product editor, you can set:
- the product name
- the product picture
- the brand
- the product size
- the selling unit
- the supermarket
- the aisle
- if the product is sold in whole quantities only
- the barcode
- the selling price
The product size must be input in weight or volume, or can be set to 1 for example for fruits and vegetables that are sold by the piece.
The selling unit is only used for display purpose in the shopping list. It can be left empty for items sold in whole quantities, and should be set to a weight or volume units for items sold be the weight or the volume.
The Whole switch indicates if the item is only sold in whole quantities or not. The app uses this information to compute the quantity of the product that must be actually purchased.
Examples: For a 8-oz can, input "8 oz" for the size, "can" for the selling unit, set the whole switch to "on". For meat that is sold by the weight, input "1 lb" for the size, "lb" for the selling unit, set the whole switch to "off".
You can select the supermarket and aisle of the product by tapping on the shop and aisle lines. Note that each product must belong to a supermarket. If you haven't yet defined any supermarket, you can do it in the supermarket selector screen.
This function requires the Grocery Plus module.
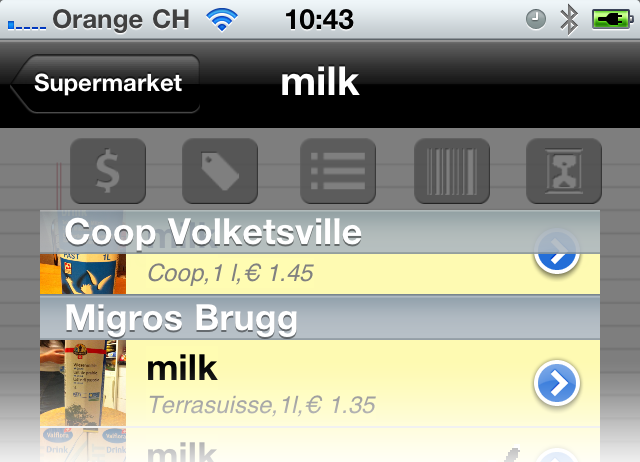
In the detail screen, you can compare the prices of the different products corresponding to the shopping item by tapping on the product selector button.
You can select a product for the current shopping list by tapping once on a product in the product selector table. The product will be marked by a checkmark.
By tapping a second time on a product, you lock this product, meaning that in the current and all subsequent shopping list, this product will be selected by default when the corresponding grocery item is added to the shopping list. The product will be marked by a padlock icon.
By clicking a third time, you can clear the lock on the product.
You can also remove a product from the selection by sweeping.
When no product is selected, the app selects by default the most advantageous product in the current supermarket.
This function requires the Grocery Plus module.
In the detail screen of a shopping item, tap the dollars icon to add the price of the currently selected product.
Note that this function is available only when a supermarket and a product is selected.
You can also input a sale price by tapping on the sale button.
The sale prices are stored in the purchase history and then cleared when you check out.
This function requires the Grocery Plus module.
To view the purchase history of a grocery item, tap the hourglass in the detail screen.
The purchase history shows you the actual prices you paid in the past for the grocery item, the quantities and the products you purchased.
You can remove an entry from the history with a sweep.
You can purchase a subscription to Cookbook Plus by taping on the "More..." button on the main application screen.
Cookbook Plus is a subscription that gives you access to Shop'NCook online services, that is:
- adding recipes easily from pictures or text,
- synchronization of the cookbooks and shopping list with Shop'NCook software for PC and Mac,
- synchronization with the Direct Access recipe database.
This is a must-have module if you want to add more than the 20 recipes allowed by default.
If you have been using Shop'NCook Lite applications that stores recipes on the Direct Access recipe database, this module allows you to download as a single cookbook all the recipes you have added to the database.
After purchasing a Cookbook Plus subscription, you will have a new button in the Settings screen allowing you to synchronize with Shop'NCook software and the Direct Access recipe database.
You will also have a new button in the shopping list allowing you to download the shopping list from the software.
You can purchase the Grocery Plus module by taping on the "More..." button on the main application screen.
With Grocery Plus module, iShopNCook becomes a complete shopping application that allows you to sort your shopping list along the aisles of your supermarkets, compare product prices, access your purchase history and much more.
This is a must-have module for budget-conscious cooks.
After purchasing the Grocery Plus module, you will have access to the pantry, to add grocery items to the shopping list and manage coupons and to the supermarket editor and picker to select and add supermarkets.
In the shopping item detail screen, you will have access to the following tools:
You can purchase the Import/Export module by taping on the "More..." button on the main application screen.
This module lets you share your cookbooks with other user's of the app and import cookbooks from Shop'NCook software.
After purchasing this module, you will be able to:
- Download bonus cookbooks: Tap on the + icon of the Kitchen toolbar and select "Download cookboooks" to access the download cookbook screen. Wait the list of cookbooks has been downloaded from the Internet. Tap in the download buttons next to the cookbooks you want to install.
- Import cookbooks from Shop'NCook software: export the cookbook in Shop'NCook software for PC or Mac by selecting "Export to XML" in the Cookbooks menu. Display then the Apps tab of your device in iTunes. Scroll down to the File Sharing section and select iShopNCook app. Drag and drop the export cookbook to the Documents area.
- Import cookbooks from e-mail: Tap on the cookbook file in the e-mail and select to open with iShopNCook app.
- Export cookbooks to iTunes: Open a cookbook. Tap on the action button of the toolbar and select "Export to iTunes".
- Send cookbooks by e-mail: Open a cookbook. Tap on the action button of the toolbar and select "Send by E-Mail".

You access the settings from the home screen. In the settings, you can:
- create an account or login to an existing account
- select your preferred unit system, US or metric
- select to display the quantities with fractions or decimal numbers
- show or hide the hints
- select the currency of the price information (requires Grocery Plus module)
- synchronize with the software (requires a Cookbook Plus subscription)
This app uses a third party JSON code. The following license terms applies to this code:
Copyright (C) 2009 Stig Brautaset. All rights reserved.
Redistribution and use in source and binary forms, with or without modification, are permitted provided that the following conditions are met:
Redistributions of source code must retain the above copyright notice, this list of conditions and the following disclaimer.
Redistributions in binary form must reproduce the above copyright notice, this list of conditions and the following disclaimer in the documentation and/or other materials provided with the distribution.
Neither the name of the author nor the names of its contributors may be used to endorse or promote products derived from this software without specific prior written permission.
THIS SOFTWARE IS PROVIDED BY THE COPYRIGHT HOLDERS AND CONTRIBUTORS "AS IS" AND ANY EXPRESS OR IMPLIED WARRANTIES, INCLUDING, BUT NOT LIMITED TO, THE IMPLIED WARRANTIES OF MERCHANTABILITY AND FITNESS FOR A PARTICULAR PURPOSE ARE DISCLAIMED. IN NO EVENT SHALL THE COPYRIGHT OWNER OR CONTRIBUTORS BE LIABLE FOR ANY DIRECT, INDIRECT, INCIDENTAL, SPECIAL, EXEMPLARY, OR CONSEQUENTIAL DAMAGES (INCLUDING, BUT NOT LIMITED TO, PROCUREMENT OF SUBSTITUTE GOODS OR SERVICES; LOSS OF USE, DATA, OR PROFITS; OR BUSINESS INTERRUPTION) HOWEVER CAUSED AND ON ANY THEORY OF LIABILITY, WHETHER IN CONTRACT, STRICT LIABILITY, OR TORT (INCLUDING NEGLIGENCE OR OTHERWISE) ARISING IN ANY WAY OUT OF THE USE OF THIS SOFTWARE, EVEN IF ADVISED OF THE POSSIBILITY OF SUCH DAMAGE.
This app uses a third party iUI code. The following license terms applies to this code:
Copyright (c) 2007-2012, iUI Project Members
Permission is hereby granted, free of charge, to any person obtaining a copy of this software
and associated documentation files (the "Software"), to deal in the Software without restriction,
including without limitation the rights to use, copy, modify, merge, publish, distribute,
sublicense, and/or sell copies of the Software, and to permit persons to whom the Software
is furnished to do so, subject to the following conditions:
The above copyright notice and this permission notice shall be included in all copies or
substantial portions of the Software.
THE SOFTWARE IS PROVIDED "AS IS", WITHOUT WARRANTY OF ANY KIND, EXPRESS OR IMPLIED, INCLUDING BUT
NOT LIMITED TO THE WARRANTIES OF MERCHANTABILITY, FITNESS FOR A PARTICULAR PURPOSE AND
NONINFRINGEMENT. IN NO EVENT SHALL THE AUTHORS OR COPYRIGHT HOLDERS BE LIABLE FOR ANY CLAIM,
DAMAGES OR OTHER LIABILITY, WHETHER IN AN ACTION OF CONTRACT, TORT OR OTHERWISE, ARISING FROM,
OUT OF OR IN CONNECTION WITH THE SOFTWARE OR THE USE OR OTHER DEALINGS IN THE SOFTWARE.
Tap on the speaker icon on the main screen to help spread the word about iShopNCook app. You can:
- Tell a friend by e-mail
- Send information on iShopNCook to a selection of your Facebook friends. Note that if your friends install iShopNCook, you can share with them recipes on Facebook with a tap.
- Rate this app on the app store or write a review
- Send us directly feedback by e-mail
If you have a valid Cookbook Plus subscription, you can synchronize your cookbooks with the software in the following way:
In Shop'NCook software for PC or Mac, select the cookbooks to synchronize and perform the synchronization. This will upload your cookbooks to the synchronization server, from where they can be dispatched to your devices and other computers.
In iShopNCook app, display the settings, login to the same account as in the software and tap on the synchronization button to initiate the synchronization.
The synchronized cookbooks will be then downloaded to iShopNCook app.
The synchronization is performed in the background and is progressive. Empty cookbooks are first created that will be filled up as the data is received from the server.
In subsequent synchronization, only the modified and new recipes are transferred.
When you synchronize, a Direct Access cookbook is also created with the recipes you have shared on the Direct Access recipe database (http://DirectAccessRecipes.com).
Note that the synchronization on the device is unidirectional at the moment: you cannot modify synchronized cookbooks on the app. The Direct Access cookbook also cannot be modified.